# websocket--3.4.stomp方式02
STOMP即Simple (or Streaming) Text Orientated Messaging Protocol,简单(流)文本定向消息协议,它提供了一个可互操作的连接格式,允许STOMP客户端与任意STOMP消息代理(Broker)进行交互。STOMP协议由于设计简单,易于开发客户端,因此在多种语言和多种平台上得到广泛地应用。
首先,我们先理解一下为什么需要STOMP。
1)常规的websocket连接和普通的TCP基本上没有什么差别的。
2)那我们如果像http一样加入一些响应和请求层。
3)所以STOMP在websocket上提供了一中基于帧线路格式(frame-based wire format)。
4)简单一点,就是在我们的websocket(TCP)上面加了一层协议,使双方遵循这种协议来发送消息。
# STOMP
# Frame

CONNECTED
heart-beat:0,0
version:1.2
content-length:0
# command类别
CONNECT
SEND
SUBSCRIBE
UNSUBSCRIBE
BEGIN
COMMIT
ABORT
ACK
NACK
DISCONNECT
# 客户端常用连接方式
ws
var url = "ws://localhost:8080/websocket";
var client = Stomp.client(url);
sockJs
<script src="http://cdn.sockjs.org/sockjs-0.3.min.js"></script>
<script>
    // use SockJS implementation instead of the browser's native implementation
    var ws = new SockJS(url);
var client = Stomp.over(ws);
[...]
 </script>
说明:使用ws协议需要浏览器的支持,但是一些老版本的浏览器不一定支持。**Stomp.over(ws)**的凡是就是用来定义服务websocket的协议。
# 服务端的实现过程
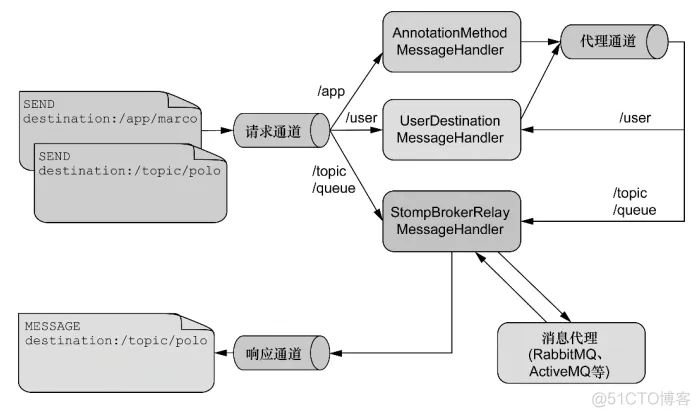
a、服务端:/app,这里访问服务端,前缀通过设定的方式访问。
b、用户:/user,这里针对的是用户消息的传递,针对于当前用户进行传递。
c、其他消息:/topic、/queue,这两种方式。都是定义出来用于订阅。并且消息只能从这里通过并处理
https://blog.51cto.com/u_16213578/7742286
# 案例
import org.springframework.context.annotation.Configuration;
import org.springframework.messaging.simp.config.MessageBrokerRegistry;
import org.springframework.web.socket.config.annotation.EnableWebSocketMessageBroker;
import org.springframework.web.socket.config.annotation.StompEndpointRegistry;
import org.springframework.web.socket.config.annotation.WebSocketMessageBrokerConfigurer;


@Configuration
@EnableWebSocketMessageBroker
public class WebSocketConfig implements WebSocketMessageBrokerConfigurer {

    @Override
    public void registerStompEndpoints(StompEndpointRegistry registry) {
        // 配置客户端尝试连接地址
        registry.addEndpoint("/ws").setAllowedOrigins("*").withSockJS();
    }

    @Override
    public void configureMessageBroker(MessageBrokerRegistry registry) {
        // 设置广播节点
        registry.enableSimpleBroker("/topic", "/user");
        // 客户端向服务端发送消息需有/app 前缀
        registry.setApplicationDestinationPrefixes("/app");
        // 指定用户发送(一对一)的前缀 /user/
        registry.setUserDestinationPrefix("/user/");
    }
}
通过实现 WebSocketMessageBrokerConfigurer 接口和加上**@EnableWebSocketMessageBroker**来进行 stomp 的配置与注解扫描。
其中覆盖 registerStompEndpoints 方法来设置暴露的 stomp 的路径,其它一些跨域、客户端之类的设置。
覆盖 configureMessageBroker 方法来进行节点的配置。
- 其中 enableSimpleBroker 配置的广播节点,也就是服务端发送消息,客户端订阅就能接收消息的节点。
- 覆盖setApplicationDestinationPrefixes 方法,设置客户端向服务端发送消息的节点。
- 覆盖 setUserDestinationPrefix 方法,设置一对一通信的节点。
import cn.coder4j.study.example.websocket.model.RequestMessage;
import cn.coder4j.study.example.websocket.model.ResponseMessage;
import org.springframework.beans.factory.annotation.Autowired;
import org.springframework.messaging.handler.annotation.MessageMapping;
import org.springframework.messaging.handler.annotation.SendTo;
import org.springframework.messaging.simp.SimpMessagingTemplate;
import org.springframework.stereotype.Controller;
import org.springframework.web.bind.annotation.GetMapping;
import org.springframework.web.bind.annotation.ResponseBody;


@Controller
public class WSController {

    @Autowired
    private SimpMessagingTemplate simpMessagingTemplate;

    @MessageMapping("/hello")
    @SendTo("/topic/hello")
    public ResponseMessage hello(RequestMessage requestMessage) {
        System.out.println("接收消息:" + requestMessage);
        return new ResponseMessage("服务端接收到你发的:" + requestMessage);
    }

    @GetMapping("/sendMsgByUser")
    public @ResponseBody
    Object sendMsgByUser(String token, String msg) {
        simpMessagingTemplate.convertAndSendToUser(token, "/msg", msg);
        return "success";
    }

    @GetMapping("/sendMsgByAll")
    public @ResponseBody
    Object sendMsgByAll(String msg) {
        simpMessagingTemplate.convertAndSend("/topic", msg);
        return "success";
    }

    @GetMapping("/test")
    public String test() {
        return "test-stomp.html";
    }
}
通过 @MessageMapping 来暴露节点路径,有点类似 @RequestMapping。注意这里虽然写的是 hello ,但是我们客户端调用的真正地址是 /app/hello。 因为我们在上面的 config 里配置了registry.setApplicationDestinationPrefixes("/app")。
@SendTo这个注解会把返回值的内容发送给订阅了 /topic/hello 的客户端,与之类似的还有一个**@SendToUser** 只不过他是发送给用户端一对一通信的。这两个注解一般是应答时响应的,如果服务端主动发送消息可以通过 simpMessagingTemplate类的convertAndSend方法。注意 simpMessagingTemplate.convertAndSendToUser(token, "/msg", msg) ,联系到我们上文配置的 registry.setUserDestinationPrefix("/user/"),这里客户端订阅的是/user/{token}/msg,千万不要搞错。
stomp与rabbitmq整合
https://blog.csdn.net/qq_32447301/article/details/104017643
https://blog.csdn.net/qq_35387940/article/details/108276136?csdn_share_tail=%7B%22type%22%3A%22blog%22%2C%22rType%22%3A%22article%22%2C%22rId%22%3A%22108276136%22%2C%22source%22%3A%22weixin_44235759%22%7D&fromshare=blogdetail
https://blog.csdn.net/u014203449/article/details/102902078